Install Fleet Pro Track - OBDII
The Plug-and-Play GPS Tracker in the vehicle provides the driving data needed to use Fleet Pro. Follow the instructions in this guide to install the OBD-II in the vehicle.
Things to know
- Take note of the serial number printed on the device. This serial is required later when you’re setting up your Fleet Pro.
- Azuga is Fleet Pro’s hardware provider.
What’s in the box?
OBD II |
|
| OBD Y cable | Required when diagnostic port is occupied |
| Extension cable | Required when diagnostic port is covered by a panel/door |


Installation
Based on the type of diagnostic port, the OBD II can be installed through any of the following
1. Port Exposed.
2. Port Occupied.
Port Exposed:
Locate the Vehicle’s diagnostic port, typically it can be found below the steering wheel. Follow the below steps to install OBD-II:

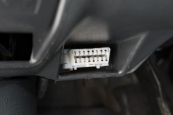
1. Switch off the vehicle or the unit on which the installation is performed.
2. Plugin the device into the diagnostic port if the port is exposed as shown in Fig:1.
3. If the port is covered by a panel/door(Fig:2), use the extension cable to install the OBD device.
| Important: Ensure the OBD device is not protruding from the panel. |
4. Setup is initialized and power is received once the LEDs on the device start flashing.
5. Ensure the Green LED lasts for 5 seconds, which indicates the device is ready to use.
| Note: If the Red LED blinks, the installation is failed, remove the device and repeat the same steps. |
Port Occupied:
If the diagnostic port is already occupied with another device then, use the Y-cable to install the device.
1. Remove the other device from the diagnostic port.
2. Plugin the female end of the Y-cable into the Port.
3. Connect the device to one end of the Y cable.
4. Connect the removed device(Step-1) to the other end of the Y cable to complete the installation.

5. Ensure the Green LED on the device lasts for 5 seconds, which indicates the device is ready to use.
| Note: If the Red LED blinks, the installation is failed, remove the device and repeat the same steps. |
Setup- Fleet Tracking
The installed OBDII device needs to be set up for fleet tracking.
Fleet Web
1. Open Fleet Web Login and enter your Login Credentials.
2. Devices and vehicles are already created in the portal. Vehicle names and device serial numbers are the same by default.
| Note: Vehicles(created by default) can be renamed as per your requirements. |
3. Click the ADMIN tab and select Vehicles.
4. Click the Pencil icon to edit/add/remove the details for the selected vehicle.

5. Fill in the mandatory(*) fields and click the Update Vehicle button.

| Note: Repeat the steps for the remaining vehicles and ensure the vehicle names are unique. |